
Table of Contents
This post will only work for anvi’o v4 or later.
As you know, the anvi’o interactive interface is quite flexible, and allows you to add many different kinds of data into a single display.
Unless you are using the interactive interface in --manual mode) (by providing every bit of data yourself in an ad hoc manner), most of the data displayed in the interface comes from pre-computed information stored in anvi’o contigs, profile, or samples databases (such as GC-content of contigs, or coverage values from samples, or number of reads mapped to a given sample, etc).
Depending on the project, however, we often want to add additional stuff into these displays. The program anvi-interactive allows its users to enrich their display with TAB-delimited data files rather quickly, but we are here because we think that flexibility is not enough.
While it is helpful to be able to extend any anvi’o display in any direction by adding new information through TAB-delimited files with --additional-layers parameter, this practice requires the users to carry around the additional data files with profile databases to make things reproducible. Plus, the lack of a user and programmer-friendly way to add or remove such additional information to anvi’o pan and profile databases complicates the implementation of cool ideas.
That’s why, while keeping the ad hoc workflow in place, we have extended anvi’o in v4 with a completely new design to work with additional data.
As a part of this design, we ended up killing the ‘anvi’o samples database’. If you are too young to remember those days, that’s fine, you are not missing anything. If you are stuck with a an anvio’o project that has a samples database, don’t worry, anvi-migrade-db program will help you to import the data in the samples database into the new tables in the profile database with no effort.
Purpose and terminology
If you are not familiar with anvi’o terminology for display items (i.e., if you don’t know what is a layer, view, or item), please read this first to familiarize yourself with various parts of standard anvio’ intearctive displays:

The purpose of this post is to show you how to annotate a display with additional data for items, layers, and layer orders. For all these tasks, we will use the same three programs, anvi-import-misc-data, anvi-export-misc-data, and anvi-delete-misc-data with different target tables (such as items to decorate items, layers to make (4) appear, or layer_orders make data for (3) available for our pan or profile databases.
Throughout this post, I will use a simple dataset for demonstration. If you would like to follow it on your anvi’o v4 or later installed computer, first run these commands:
curl -L -O http://merenlab.org/files/anvio_additional_data_tables_example.tar.gz
tar -zxvf anvio_additional_data_tables_example.tar.gz
cd anvio_additional_data_tables_example/
Dealing with data tables as a user
This section will show step by step which table is good for what in the interface. Although these examples will use a blank anvi’o profile database, everything will work the same way for regular profile databases and pan databases.
Items additional data table
This is the table you want to work with if you would like to show things for each of your contigs, gene clusters, or any other item you have in the center. The target table name for items is items.
Let’s start by visualizing the contents of the view_data.txt given the tree.txt file in manual mode the following way:
anvi-interactive -d view_data.txt \
                 -t tree.txt \
                 -p profile.db \
                 --title "Test" \
                 --manual
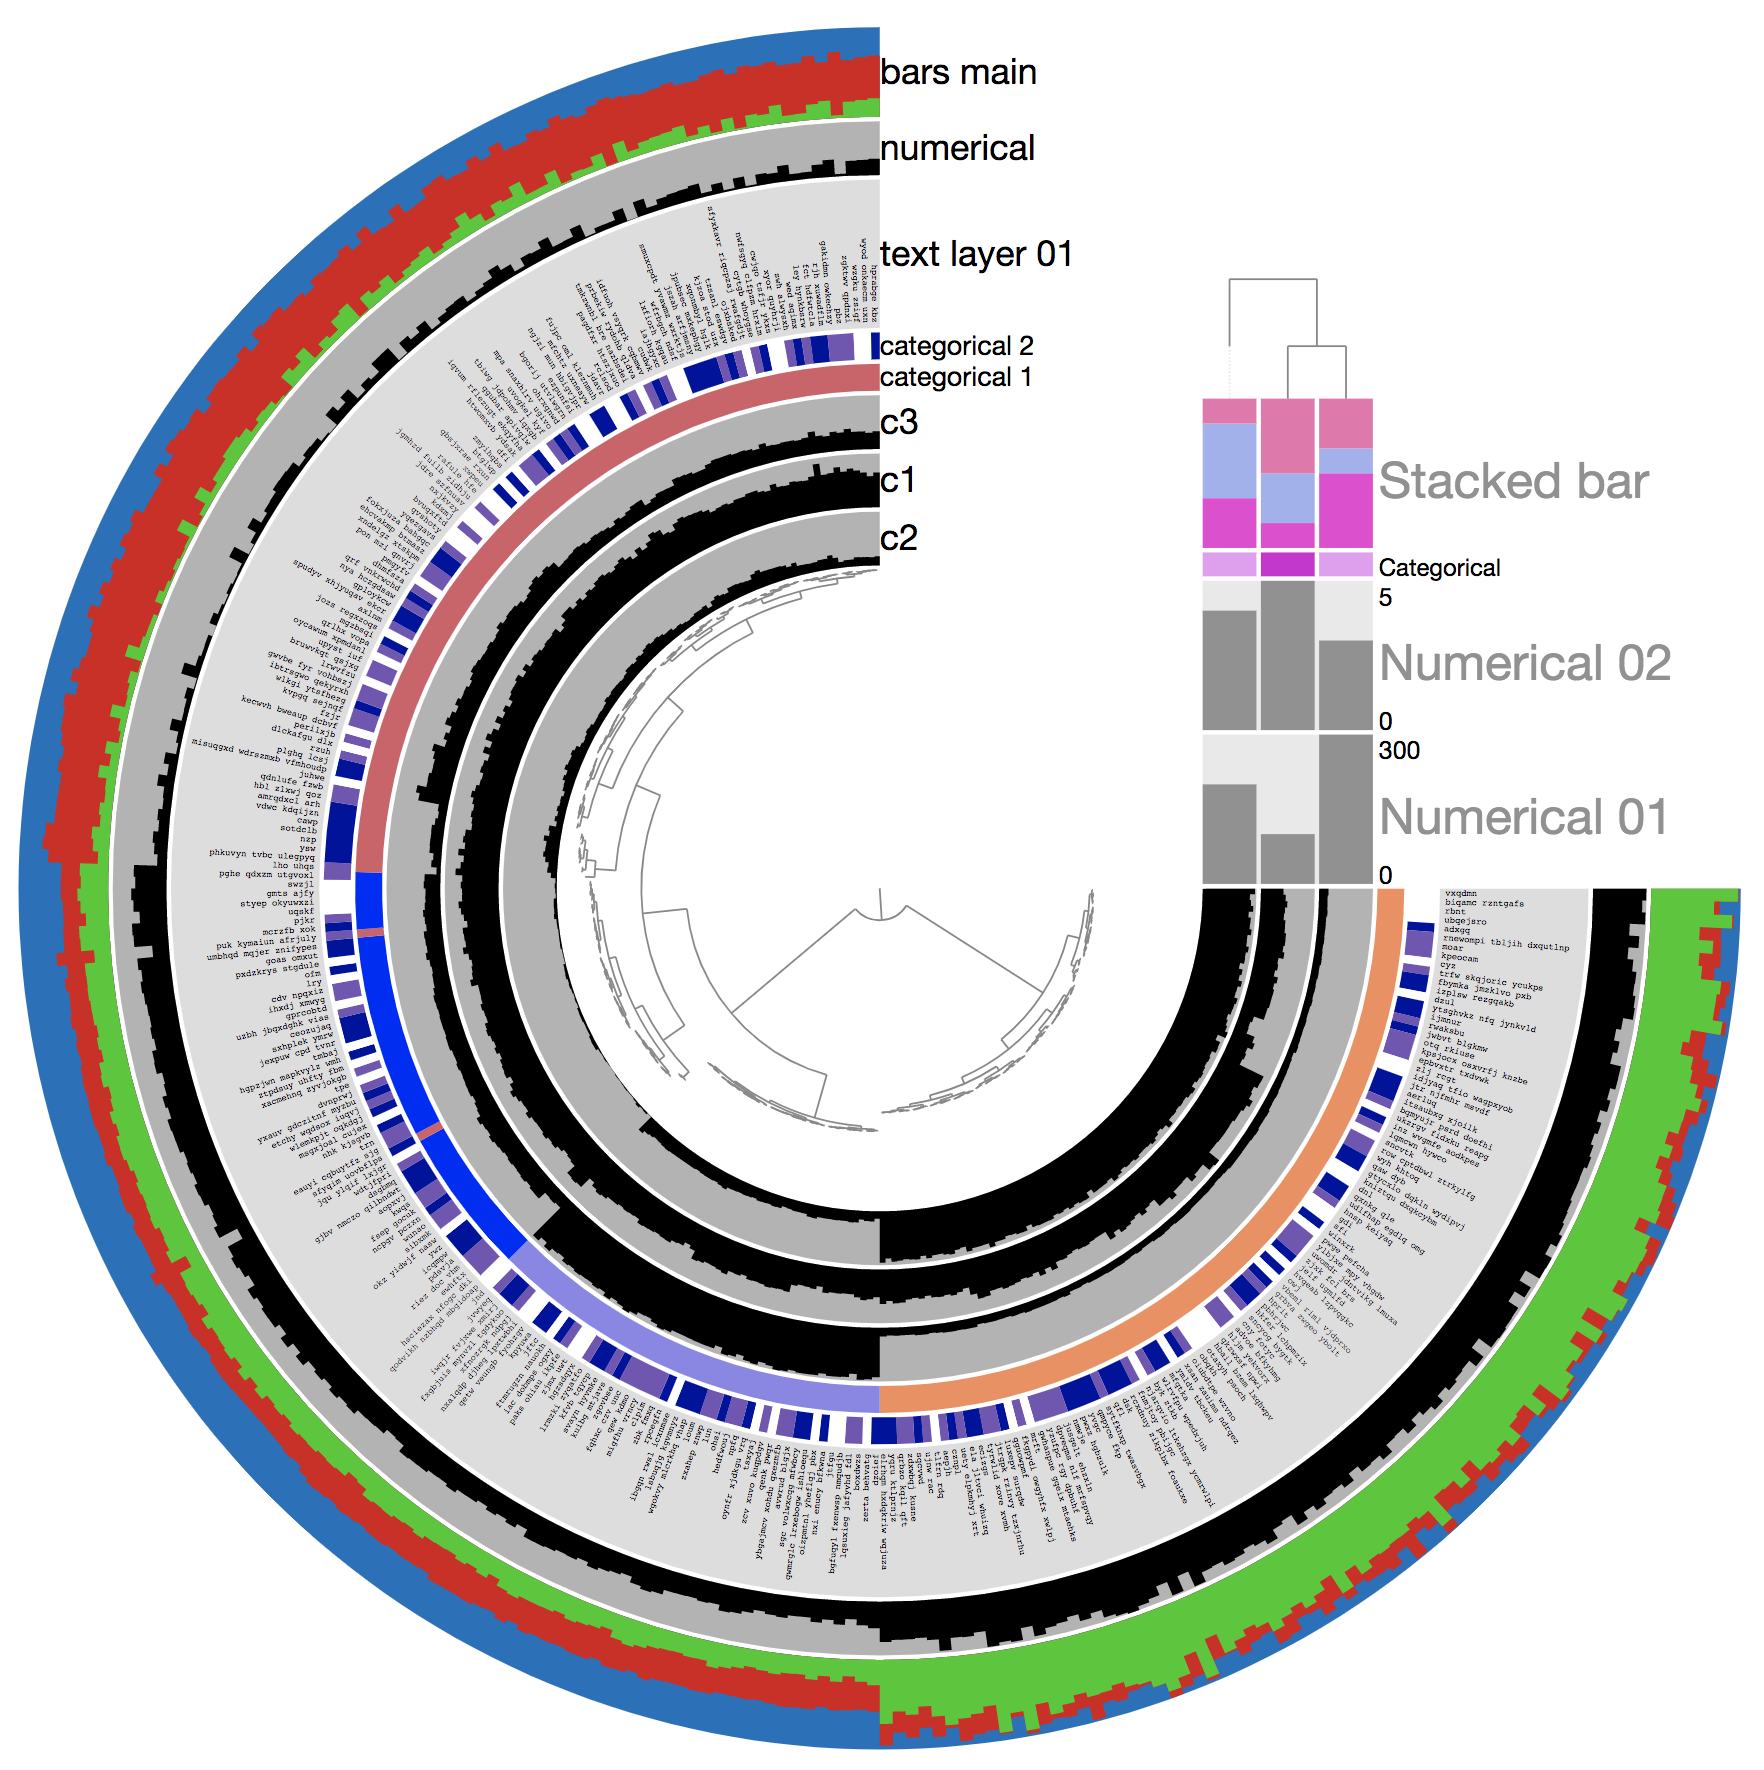
And clicking ‘Draw’ would have given us this:
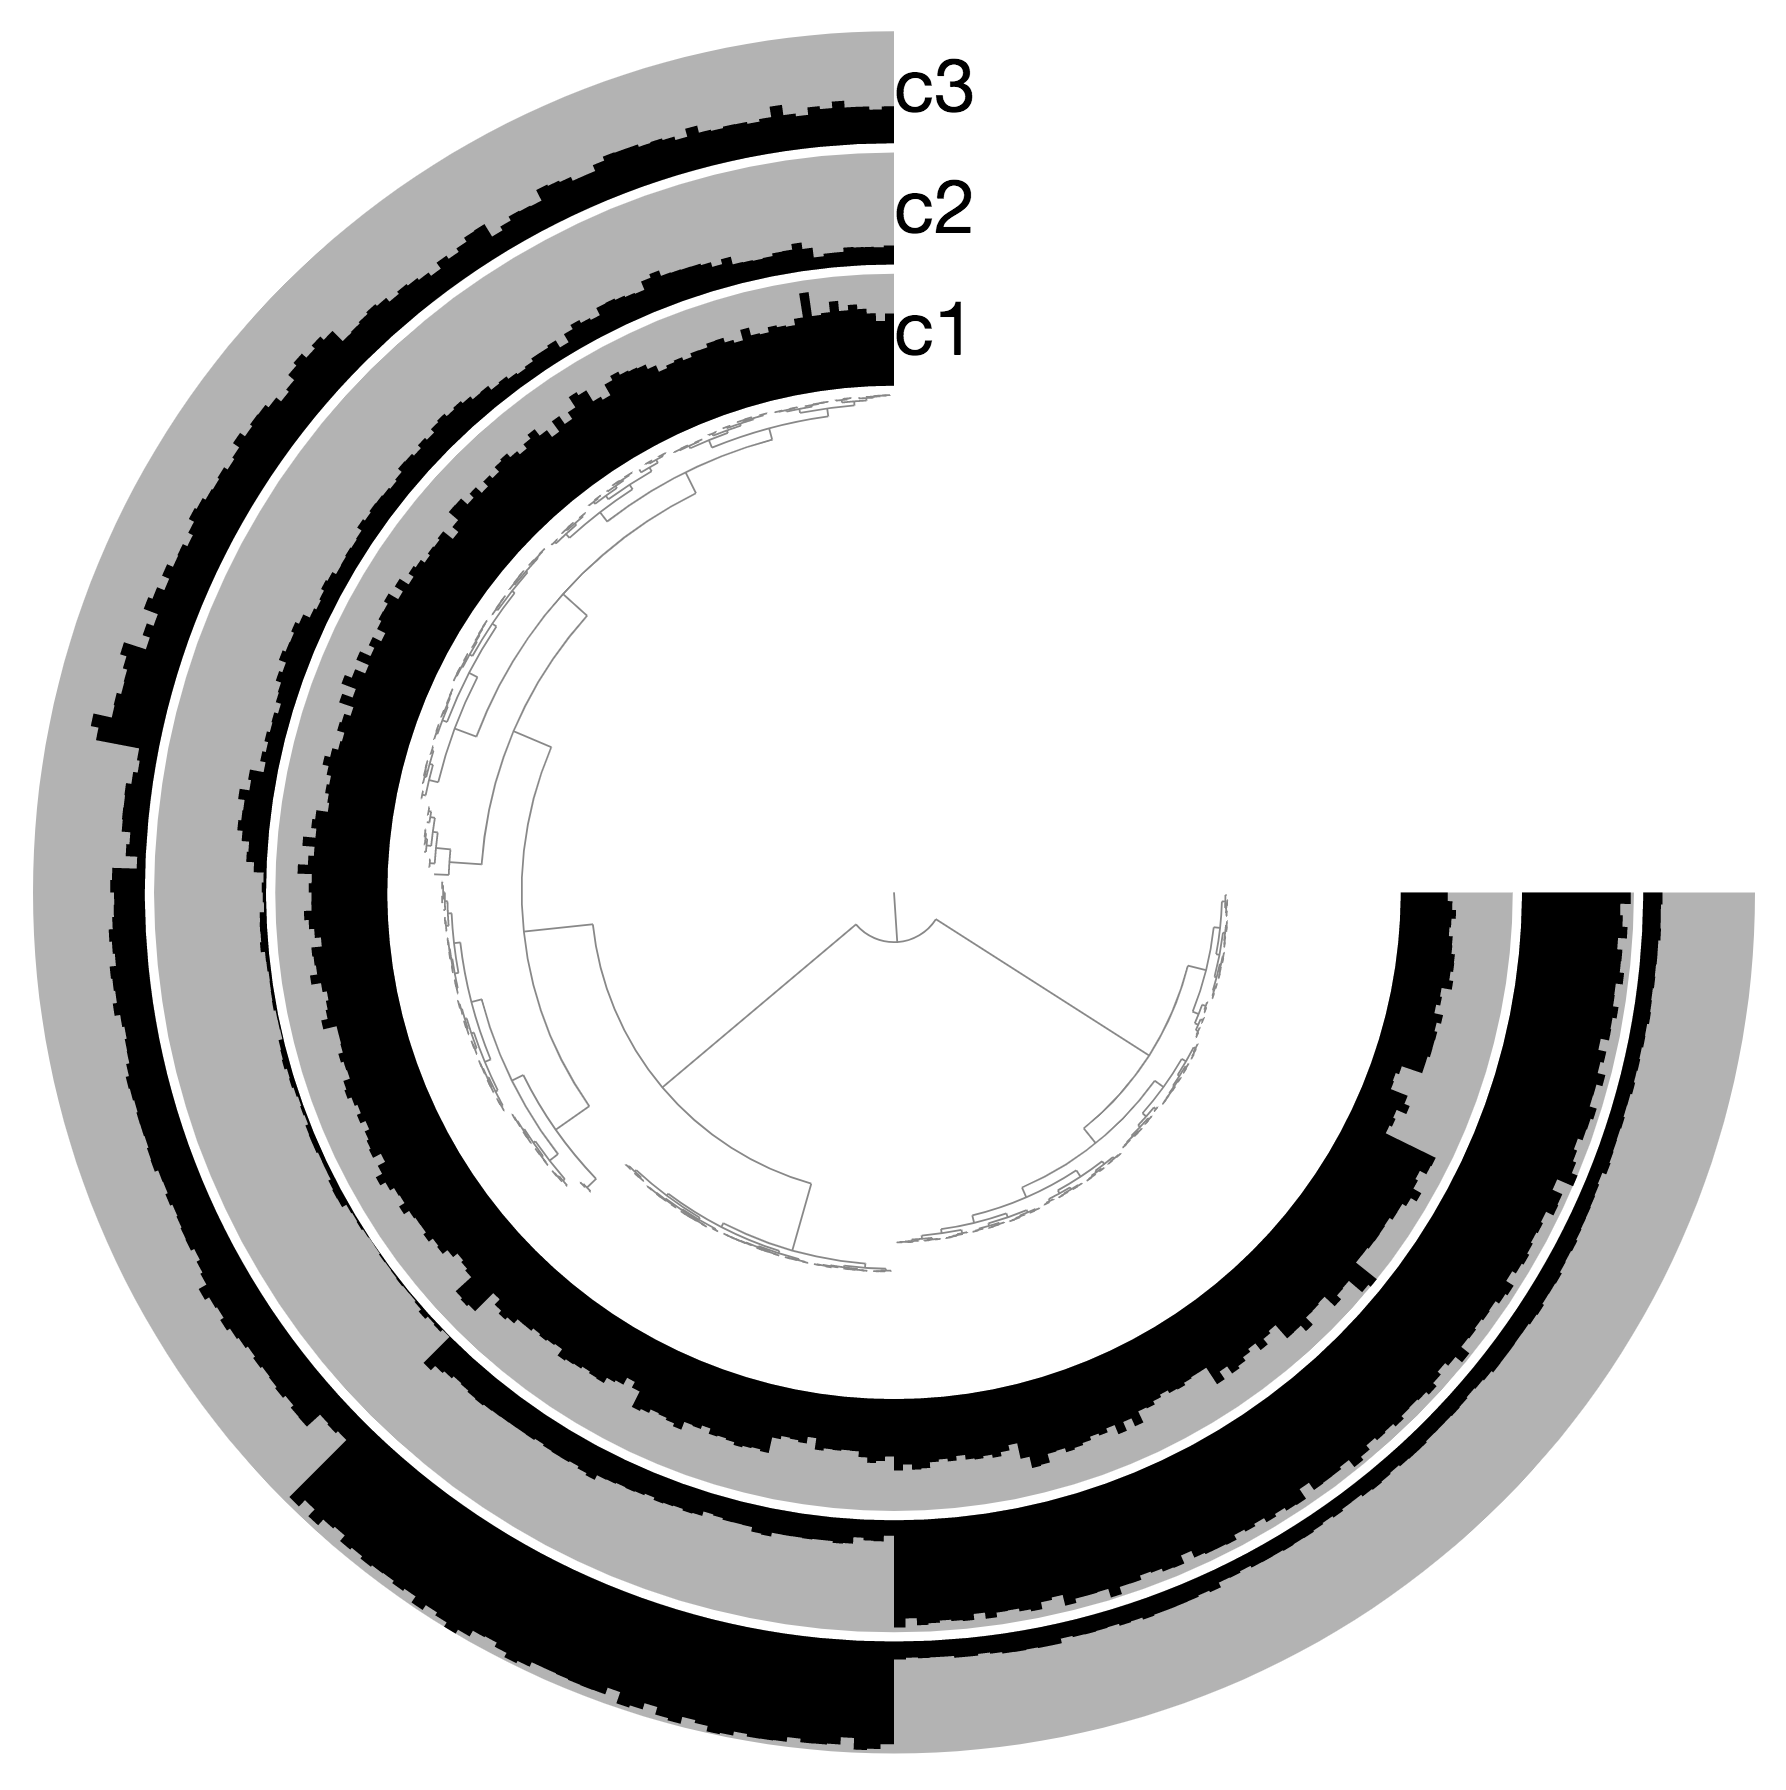
There isn’t much to look at. Fine. Let’s assume we have the following information for each item displayed in here which goes like this:
| item_name | categorical_1 | categorical_2 | text_layer_01 | numerical | bars_main!A | bars_main!B | bars_main!C |
|---|---|---|---|---|---|---|---|
| backrest | b | y | nmwje | 2.78 | 278 | 23 | 1 |
| backward | b | x | bqmyujr psrd doefhi | 2.49 | 249 | 52 | 2 |
| backwind | b | y | hkfer lchpmzix | 2.69 | 269 | 32 | 3 |
| backyard | b | x | advoe bfkyhmg | 2.05 | 205 | 96 | 4 |
| bacteria | b | x | lqmcwn hywco | 2.63 | 263 | 38 | 5 |
| bacterin | b | vxqdmn | 2.98 | 298 | 3 | 6 | |
| baetylus | b | x | fkgpydi owgyhfx xwlpj | 2.19 | 219 | 82 | 7 |
| bagpiped | b | y | ijmnur | 2.12 | 212 | 89 | 8 |
| balconet | b | y | ecizgs | 2.89 | 289 | 12 | 9 |
| (…) | (…) | (…) | (…) | (…) | (…) | (…) | (…) |
If you take a look at the view_data.txt you would realize that the first columns of both files are pretty identical.
This additional data shown for items can be imported into the profile database the following way:
$ anvi-import-misc-data items_additional_data.txt \
                              -p profile.db \
                              --target-data-table items

New data for 'items' in data group 'default'
===============================================
Data key "categorical_1" .....................: Predicted type: str
Data key "categorical_2" .....................: Predicted type: str
Data key "text_layer_01" .....................: Predicted type: str
Data key "numerical" .........................: Predicted type: float
Data key "bars_main!A" .......................: Predicted type: stackedbar
Data key "bars_main!B" .......................: Predicted type: stackedbar
Data key "bars_main!C" .......................: Predicted type: stackedbar

NEW DATA
===============================================
Database .....................................: profile
Data group ...................................: default
Data table ...................................: items
New data keys ................................: categorical_1, categorical_2, text_layer_01, numerical, bars_main!A, bars_main!B, bars_main!C.
Now running the interactive interface again will give us something extra:
anvi-interactive -d view_data.txt \
                 -t tree.txt \
                 -p profile.db \
                 --title "Test" \
                 --manual
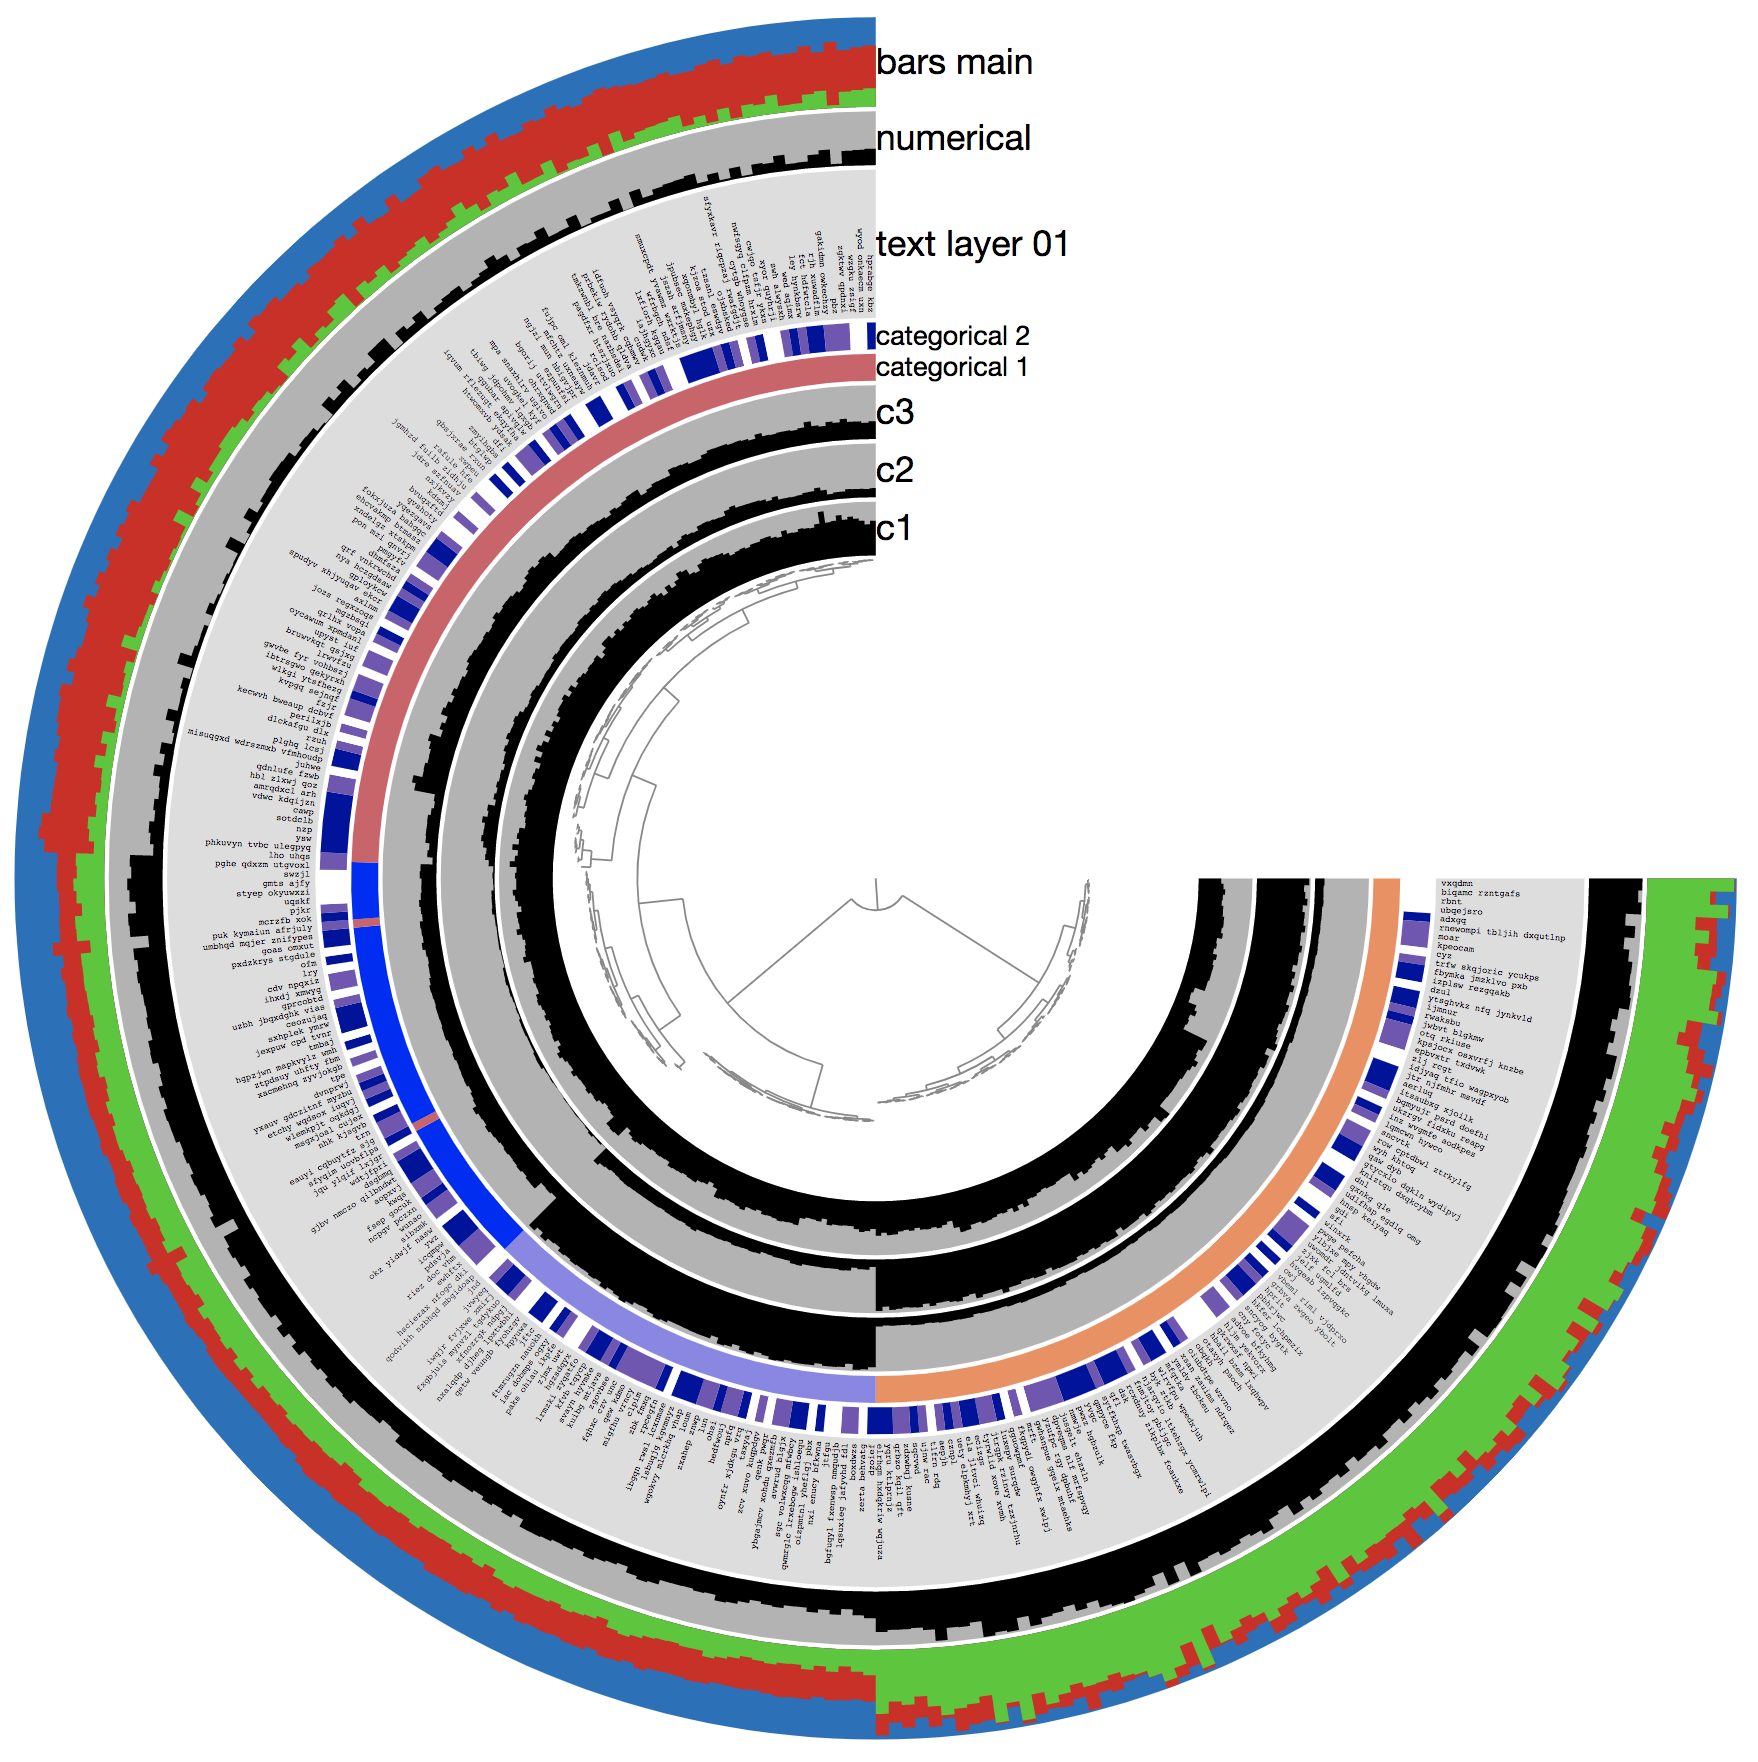
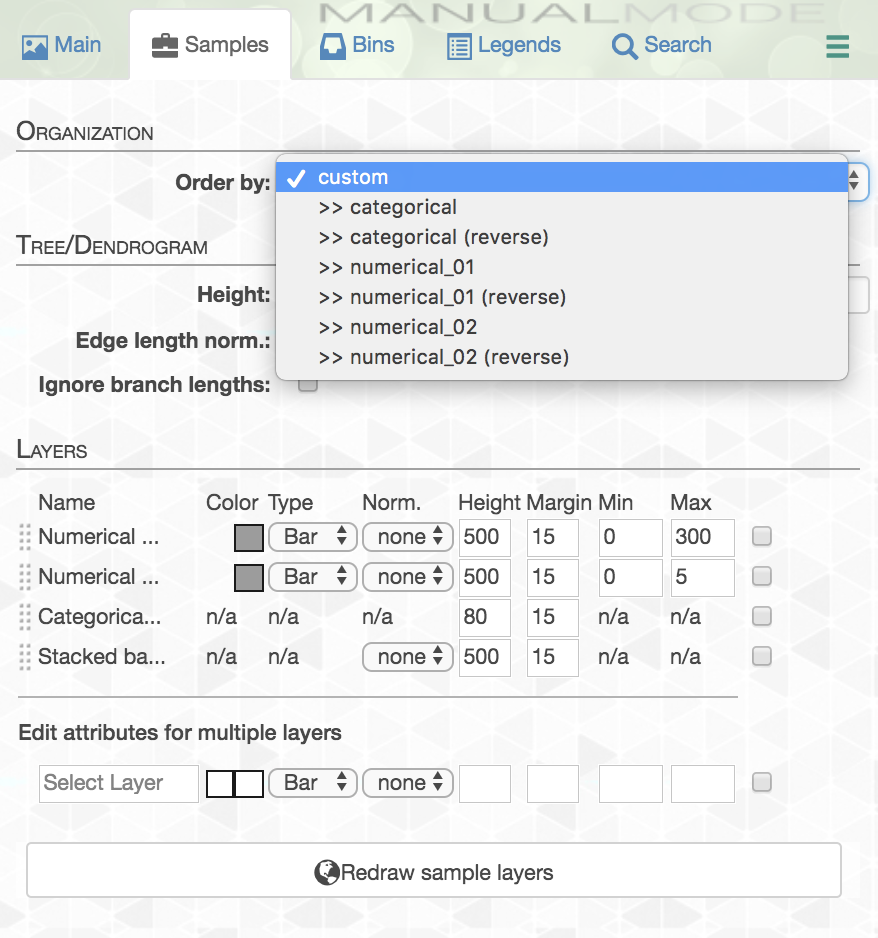
All the columns in the additional data file appears in the same order in the interface. Plus, if you click open the Settings panel, you can see the items order combo box in the main panel is already automatically populated with new orders of your items based on this new additional data:

While we are here, let’s save a default state by clicking Save State so next rounds we don’t have to click Draw.
You can export data from a given table:
$ anvi-export-misc-data -p profile.db \
                        --target-data-table items \
                        -o exported_additional_file.txt

Output file for items ........................: exported_additional_file.txt
Or you can delete the contents of a given table as a whole, or only a specific data items by specifying one or more data keys. Anvi’o can tell you about the available keys in a given table with --list-available-keys flag:
 $ anvi-delete-misc-data -p profile.db \
                         --target-data-table items \
                         --list-available-keys

AVAILABLE DATA KEYS FOR ITEMS (5 FOUND)
===============================================
* bars_main!A;B;C (stackedbar, describes 300 items)
* categorical_1 (str, describes 300 items)
* categorical_2 (str, describes 300 items)
* numerical (float, describes 300 items)
* text_layer_01 (str, describes 300 items)
Say we delete one of those:
 $ anvi-delete-misc-data -p profile.db \
                         --target-data-table items \
                         --keys-to-remove categorical_1,categorical_2

WARNING
===============================================
items data for the following keys removed from the database: 'categorical_1,
categorical_2'.
And now it’s gone:
 $ anvi-delete-misc-data -p profile.db \
                         --target-data-table items \
                         --list-available-keys

AVAILABLE DATA KEYS FOR ITEMS (3 FOUND)
===============================================
* bars_main!A;B;C (stackedbar, describes 300 items)
* numerical (float, describes 300 items)
* text_layer_01 (str, describes 300 items)
If you do not specify a data key, the entire content of the table would go bye bye:
$ anvi-delete-misc-data -p profile.db \
                        --target-data-table items


WARNING
===============================================
All data from the items additional data table is removed.
And then you would see nothing:
 $ anvi-delete-misc-data -p profile.db \
                         --target-data-table items \
                         --list-available-keys

* There are no item additional data for items in this database.
To continue with some data in our items additional data table, let’s repopulate it and continue with the layer add:
$ anvi-import-misc-data items_additional_data.txt \
                        -p profile.db \
                        --target-data-table items
Layers additional data table
This is the table you want to work with if you would like to show things for each of your layers. These layers could be your metagenomic, metatranscriptomic samples, or your genomes or any other layer identified as (2) in the figure above. The target table name for layers is layers.
Access to layer additional data tables is conceptually identical to the way we work with additional data for items, and it requires a small change in the command line. For instance, take the following file:
| samples | numerical_01 | numerical_02 | categorical | stacked_bar!X | stacked_bar!Y | stacked_bar!Z |
|---|---|---|---|---|---|---|
| c1 | 100 | 5 | A | 1 | 2 | 3 |
| c2 | 200 | 4 | B | 2 | 3 | 1 |
| c3 | 300 | 3 | B | 3 | 1 | 2 |
Now the first column of this file is identical to our layer names, and every column describes a property of a given layer.
We could add this into the profile database this way :
 $ anvi-import-misc-data layers_additional_data.txt \
                         -p profile.db \
                         --target-data-table layers

NEW DATA
===============================================
Database .....................................: profile
Data group ...................................: default
Data table ...................................: layers
New data keys ................................: numerical_01, numerical_02, categorical, stacked_bar!X, stacked_bar!Y, stacked_bar!Z.
After this, more information for each layer should show up on the right hand side when you re-run the interactive interface:
anvi-interactive -d view_data.txt \
                 -t tree.txt \
                 -p profile.db \
                 --title "Test" \
                 --manual
If you run the interactive interface again, you should see a new addition to the display:
The layer additional data in the input file is displayed with the same order they appeared in the file. In fact, if you click open the settings panel, and switch to the Samples tab, you can see that the combo box for sample orders is already populated with some automatic orders to organize your layers based on these data:
Layer orders additional data table
This is the table you want to work with if you would like to store specific orderings of your layers, such as phylogenetic trees, or orders in basic form. What you can do this table corresponds to the part identified as (3) in the example figure shown at the beginning of this post. The target table name for layers is layer_orders.
The file format for layer orders data is this:
| item_name | data_type | data_value |
|---|---|---|
| test_tree | newick | (c2:0.0370199,(c1:0.0227268,c3:0.0227268)Int3:0.0370199); |
| test_list | basic | c3,c2,c1 |
| (…) | (…) | (…) |
Each layer order could be either in basic or newick form, and you may have as many of those in a layer orders file as you like, of course. When you import a layer orders file the following way:
 $ anvi-import-misc-data layers_order.txt \
                         -p profile.db \
                         --target-data-table layer_orders

New layer_orders data...
===============================================
Data key "test_tree" .........................: Type: newick
Data key "test_list" .........................: Type: basic

New order data added to the db for layer_orders : test_tree, test_list.
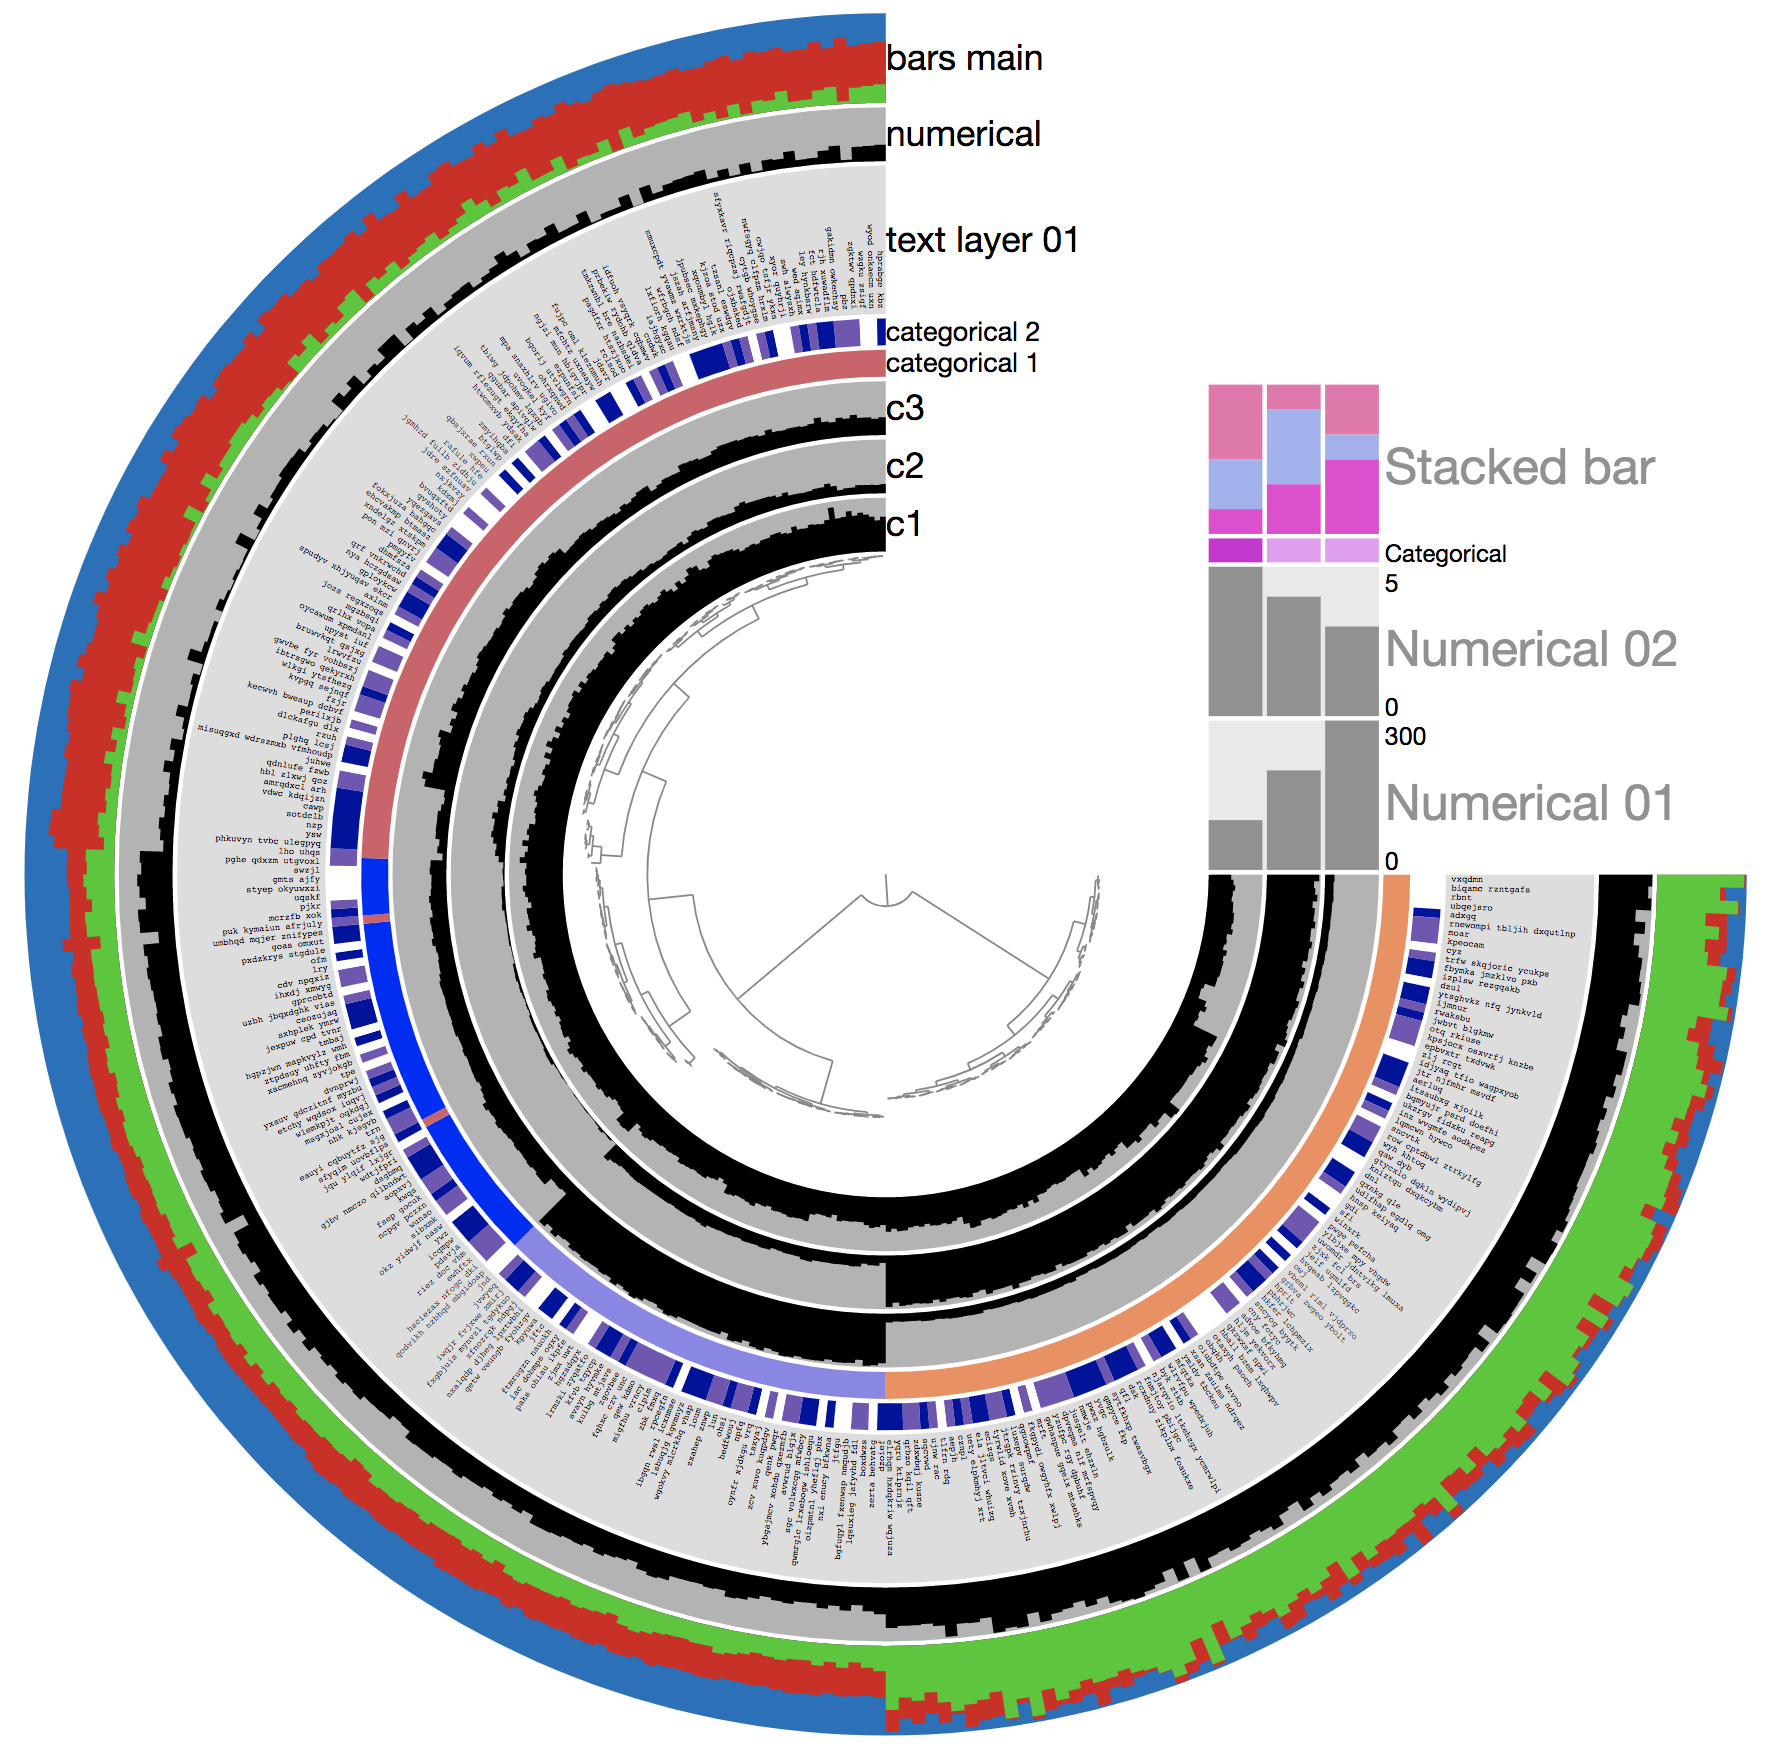
Visualize it again,
anvi-interactive -d view_data.txt \
                 -t tree.txt \
                 -p profile.db \
                 --title "Test" \
                 --manual
Now if you click open the settings panel again, and switch to the Samples tab, you can see your new orders in the combo box for sample orders:
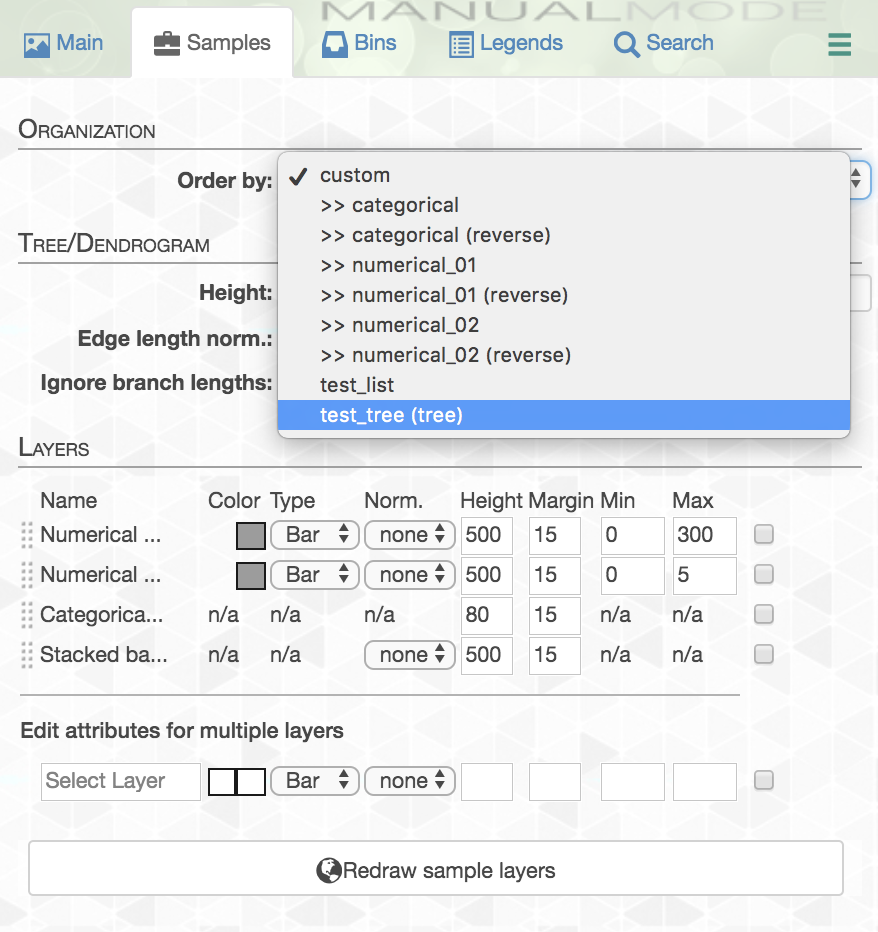
Selecting a tree type order, and re-drawing the display will show your dendrogram on the side:
Done! Now you know how to extend anvi’o interactive interface displays!
Dealing with item additional data tables as a programmer
If you are writing a Python program, you can simply deal with additional data items the following way:
import argparse
import anvio.dbops as dbops

args = argparse.Namespace(pan_or_profile_db="/path/to/profile.db", target_data_table="items")

# MiscDataTableFactory will give you the right object based on your `target_data_table`
# argument --alternatively you can directly access to the relevant class. The factory
# pattern makes it easier to seamlessly select the right inheritance route.
items_additional_data_table = dbops.MiscDataTableFactory(args)

# add data:
item_additional_data_table.add(new_keys_list, new_data_dict)

# read data:
items_additional_data_keys, items_additional_data_dict = item_additional_data_table.get()

# remove data:
item_additional_data_table.remove(keys_list)
For instance, this code should work perfectly in the directory above:
import argparse

import anvio.dbops as dbops
import anvio.utils as utils

args = argparse.Namespace(profile_db="profile.db", target_data_table="items")

# get some data:
keys = utils.get_columns_of_TAB_delim_file('items_additional_data.txt')
data = utils.get_TAB_delimited_file_as_dictionary('items_additional_data.txt')

# add it to the database (because this is a blank profile, we use `skip_check_names`
# flag. This flag is not necessary when working with regular profile
# and pan databases.
dbops.MiscDataTableFactory(args).add(data, keys, skip_check_names=True)

# get data from the database:
keys, data = dbops.MiscDataTableFactory(args).get()

# remove data:
dbops.MiscDataTableFactory(args).remove(keys)
That’s it! By just changing the target_data_table variable between items, layers, or layer_orders, you can work with different tables. That said, the following would have given identical results to the one above, but the table selection would be explicitly done rather than through the target_data_table argument:
import argparse

import anvio.dbops as dbops
import anvio.utils as utils

args = argparse.Namespace(profile_db="profile.db")

# get some data:
keys = utils.get_columns_of_TAB_delim_file('items_additional_data.txt')
data = utils.get_TAB_delimited_file_as_dictionary('items_additional_data.txt')

# add data
dbops.TableForItemAdditionalData(args).add(data, keys, skip_check_names=True)

# get data from the database:
keys, data = dbops.TableForItemAdditionalData(args).get()

# remove data:
dbops.TableForItemAdditionalData(args).remove(keys)
Please feel free to ask any questions.