Table of Contents
This tutorial is tailored for anvi’o v1 branch, and version 1.2.0 or later. Please update your installation first if you have an earlier version installed. You can learn which version you have on your computer by typing anvi-profile --version in your terminal.
You should really consider upgrading your anvi’o to v2.
This tutorial gives a brief overview of anvi’o metagenomic worklow. If you run into any issues, please post a comment down below, or open an issue. When you post a comment or an issue, please mention the anvi’o version, the operating system you are using.
If you are here, you must have already installed the platform, and have run the “mini test” succesfully.
Finally, please stick with stable versions of the platform, unless you like living at the edge, as the snapshots from the codebase can be very unstable and/or broken.
Preparation
To run anvi’o, you at least need these files:
- A FASTA file of your contigs. I will call it
contigs.fathroughout this manual. - BAM files for your samples. Let’s say, for the sake of brevity, you have two samples in your analysis,
XandY, and the BAM files for these samples, which were generated by mapping reads inXandYtocontigs.fa, and are named asX-raw.bamandY-raw.bam.
It is that simple.
However, your FASTA file must have simple deflines, and if it doesn’t have simple deflines, you must fix your FASTA file prior to mapping. This is necessary, because the names in contigs.fa must match the names in your BAM files. But ynfortunately, different mapping software behave differently when they find a space character, or say a | in your target FASTA file, and they proceed to change those characters. Therefore it is essential to keep the sequence IDs in this file as simple as possible before mapping. To avoid any problems later, take a look at your deflines prior to mapping now, and remove anything that is not a digit, an ASCII letter, an underscore, or a dash character. Here are some examples:
BAD deflines:

>Contig-123 length:4567
>Another defline 42
>gi|478446819|gb|JN117275.2|

GOOD defilnes

>Contig-123
>Another_defline_42
>gi_478446819_gb_JN117275_2
If you are already done with your mapping, and want to make sure you are not going to run into any issues later on, please run these two commands in your terminal:
grep '>' contigs.fa | head
anvi-profile -i X-raw.bam --list-contigs | head
If they do not look identical, you must fix your FASTA file to match contig names you see in your BAM file. In some cases you may realize that there is no way but redoing the mapping.
For instance we always run into a ticky issue when we export our contigs and BAM files using CLC, and end up having to run these two commands before we begin our analysis with anvi’o:
sed -i 's/ .*$//g' contigs.fa
sed -i 's/_contig_/contig/g' contigs.faMEGAHIT, one of our favorite assemblers, also requires some fixing. To fix your deflines in the your MEGAHIT outputs, you can simply run this command in your Linux terminal:
sed -i 's/ .*$//g' contigs.faWhat you need to do to fix your deflines may differ, if you are using some other assembler and are not sure what to do to fix your deflines before mapping, please drop us a note and we will update these instructions for your assembler.
Programs to analyze contigs FASTA
Following sections will describe each program you will frequently use while walking you through an example analysis. To see a complete list of programs that are distributed with the platform, type anvi- in your terminal, and then press the TAB key twice.
anvi-gen-contigs-db
Contigs database will be the essential ingredient everything you will do with anvi’o. It will process contigs.fa, and store it in a better formatted way. You can decorate your contigs database, but the one command you have to run is this:
anvi-gen-contigs-database -f contigs.fa -o contigs.db
Each anvi-* program has a help menu that explains available parameters. Don’t forget to check them for everything you run. If something is not clearly explained, let me know:
anvi-gen-contigs-database --help
Once you have the contigs database, you can decorate it with stuff that would be very useful later.
anvi-populate-genes-table
This program populates relevant tables in the contigs database with functional information on contigs. I will give an example using RAST annotation.
If you have MyRAST installed, you can run these two commands to store the annotation of your contigs in the contigs database (the first line will query RAST server, which may take a while depending on the number of contigs you have), the second line will incorporate the returning info into anvi’o’s contigs database:
svr_assign_to_dna_using_figfams < contigs.fa > svr_assign_to_dna_using_figfams.txt
anvi-populate-genes-table -c contigs.db -p myrast_cmdline_dont_use -i svr_assign_to_dna_using_figfams.txt
Once you have RAST annotations, I suggest you to run the following command to export the information from the table into a more native matrix form and store it separately (if you take a look at the exported matrix, you will see that it is a simpler, and more standard form of what we got from RAST):
anvi-export-genes-table -c contigs.db -o rast_annotation.txt
If you have to re-create the contigs database for some reason, you can now use this newly generated file (rast_annotation.txt) to repopulate the contigs database instead of querying RAST again using the following command:
anvi-populate-genes-table -c contigs.db -p default_matrix -i rast_annotation.txt
anvi-populate-search-table
The program populates tables that holds HMM search results in the contigs database.
Anvi’o can do wonders with HMM models. To decorate your contigs database with hits from HMM models that ship with the platform (which, at this point, constitute published single-copy gene collections), run this command:
anvi-populate-search-table -c contigs.db
If you are here, you are pretty much done with your contigs database!
Programs to analyze BAM files
anvi-init-bam
Anvi’o requires BAM files to be sorted and indexed. This is why I named the example BAM file for Sample X CLC or Bowtie generated as X-raw.bam, instead of X.bam.
If your BAM files already sorted and indexed (i.e., for each sample there is a .bam and .bam.bai file in your working directory), you can skip this step. Otherwise, to initialize the BAM file for Sample X you can run this command (note that the output file name is only the sample prefix, and it is not X.bam but only X without an extension):
anvi-init-bam X-raw.bam -O X
But of course it is not fun to do every BAM file you have one by one. So what to do?
A slightly better way to do would require you to do it in a for loop. First create a file called, say, SAMPLE_IDs. For your samples (X and Y) it will look like this:
$ cat SAMPLE_IDs
X
Y
Then, you can run anvi-init-bam on all of them by typing this:
for sample in `cat SAMPLE_IDs`; do anvi-init-bam $sample-raw.bam -O $sample; doneGood.
anvi-profile
Profiling step makes sense of each BAM file separately by utilizing the information stored in the contigs database. The result of the profiling step is a special file that describes the run (RUNONFO.cp), and a profile database (PROFILE.db).
The minimal command to profile a BAM file looks like this:
anvi-profile -i X.bam -c contigs.db
But I encourage you to take a look at the default paramers. One of the most critical parameter is -M (--min-contig-length) parameter. The default is 10,000. Which means the profiling step will take into consideration only the contigs that are longer than 10Kb. This may be too large for your analysis. But clustering and visualization steps in anvi’o have some limitations, so you can’t really say -M 0 in most cases. The rule of thumb is to keep the number of contigs anvi’o will deal to a maximum of 20,000. How can you know how many contigs are there for a given -M value? Well, one thing to find that out is this:
sqlite3 contigs.db 'select count(*) from contigs_basic_info where length > 10000;'
This command will print out the number of contigs longer than 10Kb in your dataset. You can try different values until the output is about 20,000, and use that value for -M. But I will not recommend you to go below 1Kb. The main reason to that is the fact that anvi’o relies on k-mer frequencies to better cluster contigs, and tetra-nucleotides (the default way for anvi’o to make sense of the sequence composotion) become very unstable very quickly.
Once you know what you -M is, you can, again, profile multiple samples using the similar approach we used for initializing BAM files:
for sample in `cat SAMPLE_IDs`; do anvi-profile -i $sample.bam -M YOUR_M_VALUE -c contigs.db; done
Note: If you are planning to work with and visualize single profiles (without merging), use --cluster-contigs flag (more explanation on this will come later). You don’t need to use this flag if you are planning to merge multiple profiles (i.e., if you have more than one BAM files to work with).
Programs to work with anvi’o profiles
anvi-merge
Once you have your BAM files profiled, the next logical step is to merge all the profiles that should be analyzed together.
It goes without saying that every profiling step must have used the same parameters for analysis. If profiles have been generated with different contigs databases or with different parameters will not get merged, and you will get angry error messages from anvi’o.
In an ideal case, this should be enough to merge your stuff:
anvi-merge X/RUNINFO.cp Y/RUNINFO.cp -o XY-MERGED -c contigs.db
Or alternatively you can run this:
anvi-merge */RUNINFO.cp -o XY-MERGED -c contigs.db
Before you run these commands in your real-world data, you must understand the details of clustering.
Clustering during merging
A default step in the merging process is to generate a hierarchical clustering of all splits using anvi’o’s default clustering configurations. One of these clustering configurations clusters contigs using only k-mer frequencies (if you generated your contigs database with default parameters, the k is 4, and your k-mer frequencies will be ‘tetranucleotide frequencies’), another one of them mixes k-mer frequencies with distribution patterns across samples for clustering, etc. The hierarchical clustering result is necessary for visualization, and supervised binning. Therefore, by default, anvi’o will attempt to cluster your contigs using these configurations. However, if you have, say, more than 25,000 splits, clustering step will be very time consuming (multiple hours to even days), and visualization of this data will be very challenging. There are other solutions to this problem that will be discussed later, but if you would like to skip hierarchical clustering, you can use --skip-hierarchical-clustering flag.
During merging, anvi’o will also use CONCOCT for automatic binning. CONCOCT can deal with hundreds of thousands of splits. Which means, regardless of the number of splits you have, and even if you skip the hierarchical clustering step, there will be a collection in the merged profile database (collection id of which will be ‘CONCOCT’) with genome bins identified by CONCOCT in an unsupervised manner, from which you can generate a summary. But if you would like to skip CONCOCT clustering, you can use --skip-concoct-binning flag.
anvi-import-collections
Here is a completely optional step: using this program you can add your external binning results into your merged profile database.
For instance, if you have some CONCOCT, MetaBat, or ESOM results for your contigs, you can let anvi’o know about them like this:
anvi-import-collection external_binning_of_splits.txt -p XY-MERGED/PROFILE.db -c contigs.db --source-identifier "MY_EXTERNAL_BINNING"
If you have a colors file, you can add it into the mix to have some specific visual identifiers for your bins by adding --colors colors.txt
You can find example files to learn about the format of these simple files here: example_files_for_external_binning_results.
anvi-interactive
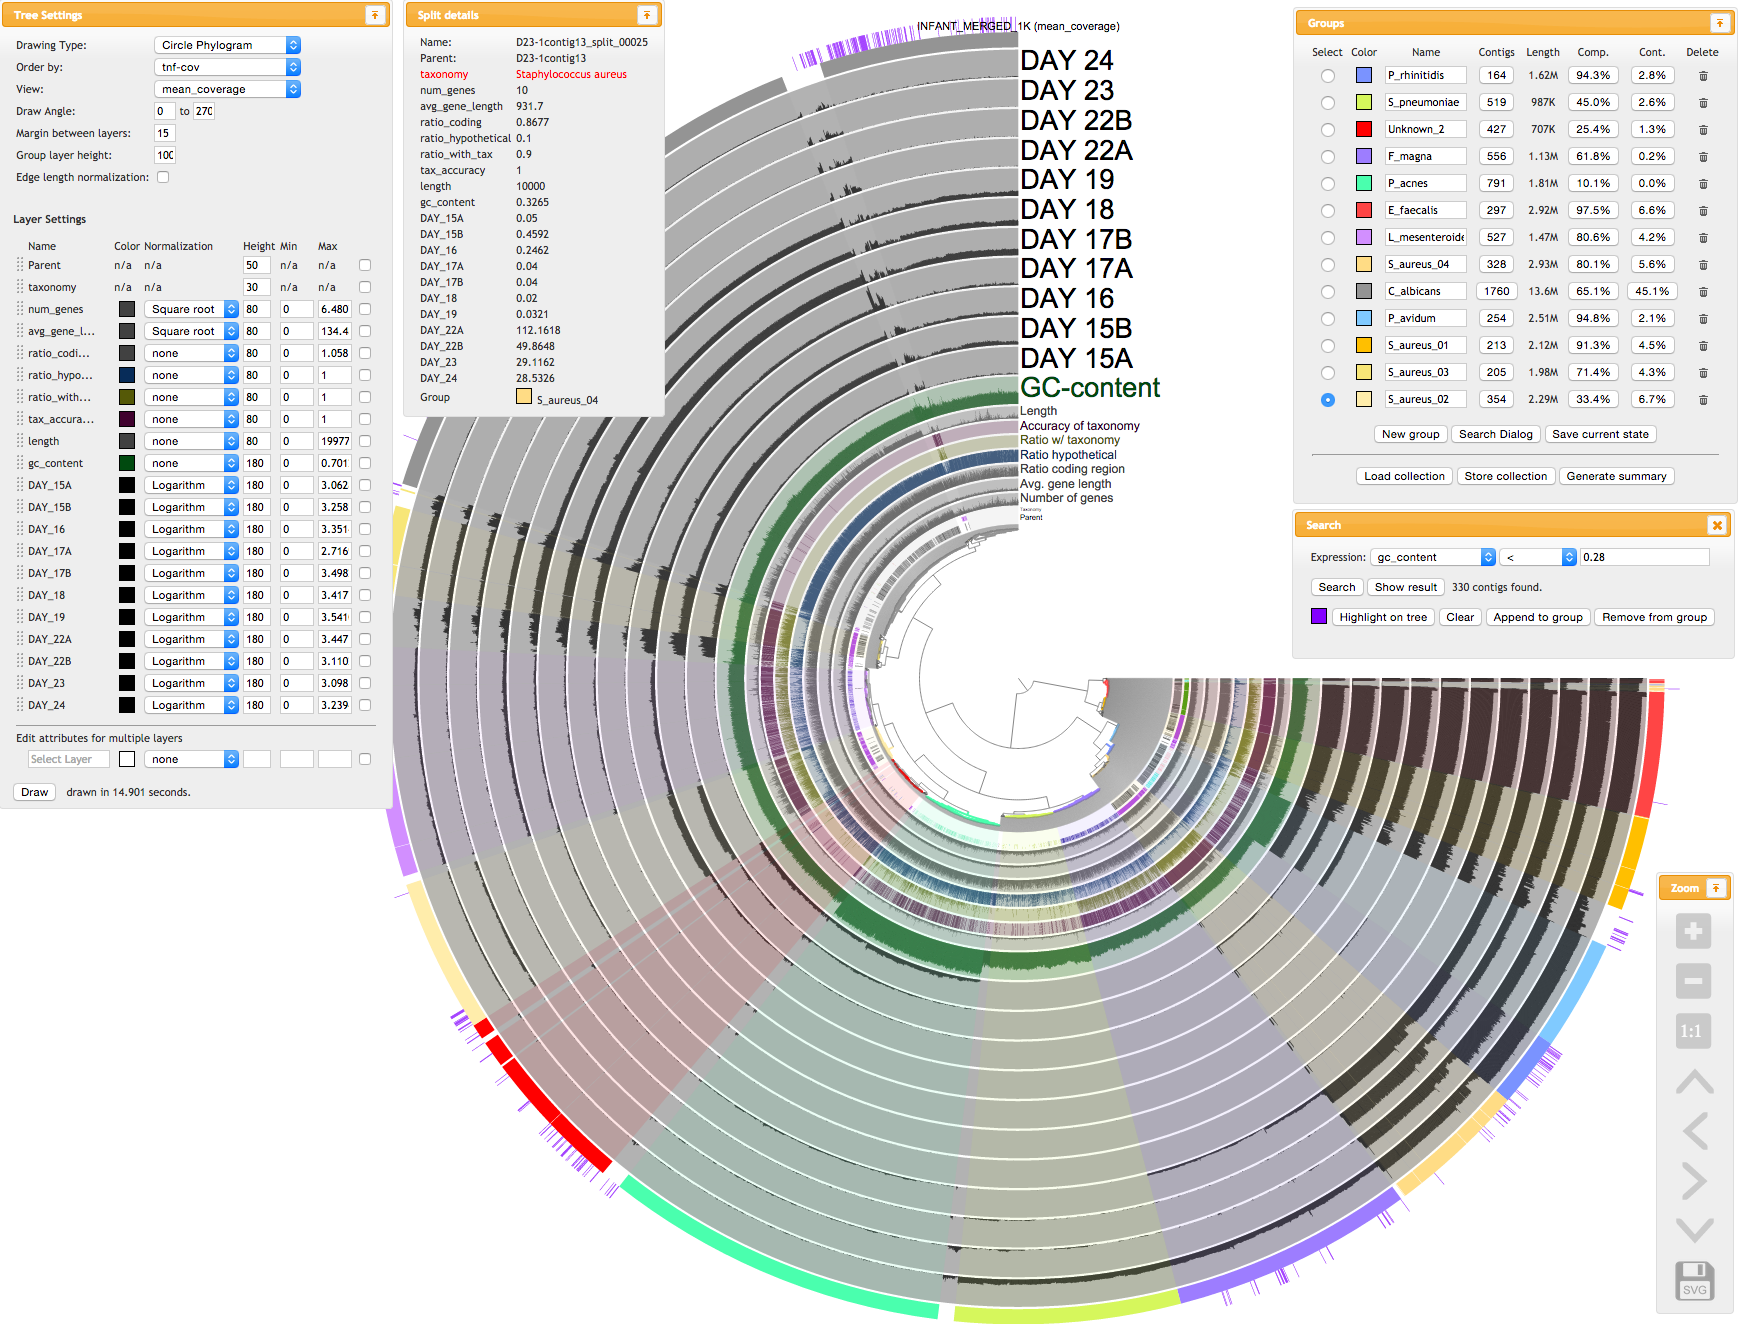
Interactive interface is good for a couple of things: it allows you to browse your data in an intuitive way, shows you multiple aspects of your data, visualize the results of unsupervised binning, and most importantly, it allows you to perform supervised binning. In order to run the interactive interface on a run, hierarchical clustering must have been performed, and stored in the profile database (otherwise you will hear anvi’o complaining about that).
Once the merging is done you can finally run the interactive interface:
anvi-interactive -p XY-MERGED/PROFILE.db -c contigs.db
If you had too many contigs and had to skip the hierarchical clustering step during merging, and if you only have unsupervised binning done by CONCOCT, don’t be worried and keep reading on.
But just to give you an idea, here is a screenshot from the interactive interface (taken while we were analyzing a random interface with anvi’o version 0.8.1):
anvi-summarize
Once you have a collection, it is time for you to summarize your results.
Collection could be genome bins identified by CONCOCT in an unsupervised manner during anvi-merge, or it could be genome bins you identified through anvi-interactive. anvi-summary will take the collection id as a parameter, and generate a static HTML output for you, during which, among other things,
- All your splits will be merged back to contigs and stored as FASTA files,
- Completion and contamination scores for your genome bins will be computed and stored into files,
- Matrix files will be generated for your genome bins across your samples with respect to their mean coverage, variability, etc.
You can run this to summarize the bins saved under the collection id ‘CONCOCT’ into MY_SUMMARY directory:
anvi-summarize -p XY-MERGED/PROFILE.db -c contigs.db -o XY-MERGED-SUMMARY -c CONCOCT
If you are not sure which collections are available to you, you can always see a list of them by running this command:
anvi-summarize -p XY-MERGED/PROFILE.db -c contigs.db -o XY-MERGED-SUMMARY --list-collections
anvi-refine
After running anvi-summarize, you may realize that you are not happy with one or more of your bins. This often is the case when you are working with very large datasets and when you are forced to skip the supervised clustering step. anvi-summarize gives you the ability to make finer adjustements in a bin that is not complete.
Please read this article for a comprehensive introduction to refinement capacity of anvi’o.
FAQ
I run into an issue, whose fault is it?
It is Tom’s. But you can always enter a bug report if you are certain that it needs to be fixed in the anvi’o code base.